source: www.youthwork-practice.com | 2000 Games, Devotions, Themes, Ideas and more for Youth Work
only for private using
Instructions for lanterns
Materials:

- Different coloured thin paper; important thing is that the paper is translucent (>>> candle) and, if possible, also is absorbent (so that the wallpaper paste gets a better grip)
- Cardboard for templates
- Possible "straight" glasses
- Wallpaper paste including container for mixing; brush
- Pencil
- Pointed scissors and for the older kids Stanley knives (they are better workable), do not forget chopping boards
- Sturdy, slightly thicker wire (approximately 2 mm diameter) for holding the tea light; pliers to bend the wire
- Tea lights
That's how it's done:
-
That’s what it’s supposed to look like:
-
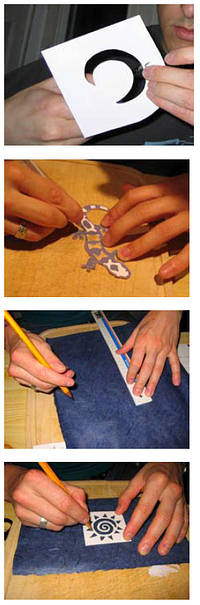
The first thing you need are a few inspiring templates. Prepare them in different difficult levels, so that younger kids don’t have to try too hard and the older kids are still a bit challenged.
These templates are glued to thicker cardboard ...
-
Then cut it all out. If you are dealing with multipart templates, best to cut out the NEGATIVE, just like on the image below.
-
Even when cutting out more delicate shapes, always try to be as accurate as possible and also cut out the little gaps.
-
Once the templates are finished, you can begin with the cover for the lantern. Start by measuring the height and diameter of your glass. Preferably add 1cm at the end. Now cut from the translucent paper a rectangle, big enough to cover the glass.
Put your cut out template in the middle of the rectangular paper and trace the contours with a pencil.
-
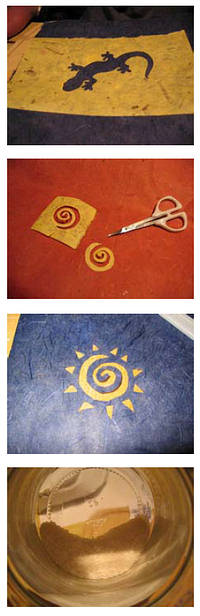
Next cut the image carefully, using scissors or a Stanley knife, from the inside out. Make sure that you don’t make too many mistakes with the cutting. Finally, the cut out inner piece is no longer needed.
-
Now transfer you shape once again on another coloured piece of paper. The size does not matter as long as it is big enough for your shape.
IMPORTANT: This time around cut the template from the outside and keep the cut piece while the outer part is not needed anymore.
-
Both motifs (from step 7 and 8) should more or less fit well together.
-
Once you prepared the wallpaper paste according to the instructions on the packaging (don’t make too much as you only need a little, and also not to thick. If needed you can dilute it a bit).
Now take your glass and sparingly, as well as, evenly paint the wallpaper paste on your glass. Make sure the layer of paste is not too thin either.
-
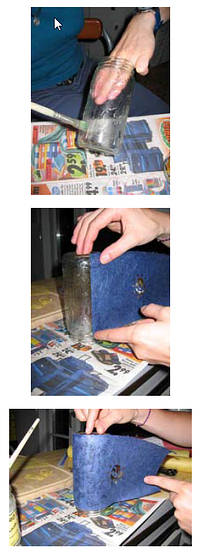
Now wrap your big piece of paper carefully around the glass.
-
Make sure you get the paper on straight. Using your fingers press firmly against the glass and if needed smooth out bubbles and creases.
-
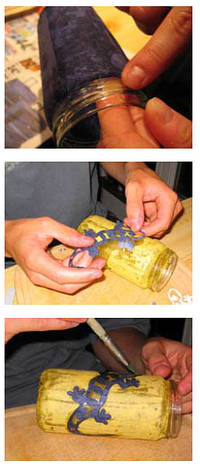
Where beginning and end of your paper meet, you can put on a little bit more wallpaper paste for a better grip. At the top and bottom edges of the glass just fold the paper over.
-
Now, where you have the cutout gap, stick the shape (you cut out in another coloured paper earlier on)
If any areas are not sticking well to the glass, you can put the paste on top of the paper. After drying, the glue is virtually invisible.
-
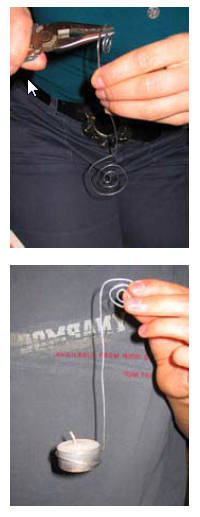
Finally, using your pliers bend a holder for your candle. This holder is more or less only for the easier retrieval of the candle/tea light.
-
The bottom of the holder should be designed in a way so that the wire is wrapped around the tea light. That ensures that the tea light stays at the bottom and can’t slip to the side either.
-
Here you can see how the finished lantern with the tea light inside will look like.
-
Have fun making light your lantern!
[ © www.youthwork-practice.com | 2000 Games and Ideas for Youth Work ]


