source: www.youthwork-practice.com | 2000 Games, Devotions, Themes, Ideas and more for Youth Work
only for private using
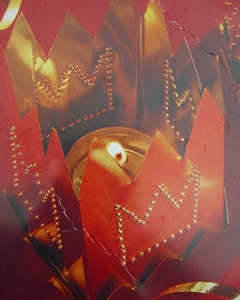
Shiny foil table lanterns
Material:
You need the following craft material:
- Metal foil
- Paper
- Pencil
- A strong, sharp needle or thin nails
- Strong box or wooden board
- Scissors
- Ruler
- Metal glue
- Clothes peg
- Decorative stones
- Creative sheet
Instructions:
Table lanterns can be made from thin brass foil which can be bought in selected craft stores. Thin tin sheet foil, aluminium foil or such is just as good. Metal foil can be easily cut with a normal strong pair of scissors. First of all you should produce a stencil of a motive on a sheet.
Transfers the outlines onto a piece of metal foil and cut out the motive along the edges. With a strong, sharp needle and a hammer, little holes are made in the foil to make a pattern. Instead of a darning needle you can also use a hammer and thin nails. So that you do not damage the surface underneath, the metal foil should be place on a strong piece of cardboard or a wooden board.
You will need a special metal glue or glue which is also suitable for metals in order to stick the lantern together. The bottom, which also has a zigzag edge, is made at the end from a piece of metal foil.
How to make the lantern in detail:
-
First of all you make a paper stencil from the pattern on the sheet. Fold the metal foil into four equal sized pieces and fold the narrow end over with an edge of 1.5cm. Now you transfer the stencil and draw a crown on each quarter.
-
Cut out the pattern with a strong pair of scissors along the markings. Only cut out the zigzag edge on the side and not the drawing of the crown in the middle of the foil.
-
You now place the metal foil on a soft surface. Hold a sharp darning needle vertically to the marked lines and use a hammer to make holes at even distances apart so that a dotted line is produced.
-
You then hold a ruler on the pre-folded line and fold the foil vertically. Place glue on the narrow end and stick it to the opposite end. Hold the ends together with a clothes peg until it dries.
-
You now take the stencil for the bottom plate in the size of the bottom surface of the lantern with an extra amount of space for the edge and then produce the bottom plate. The pattern you would like is then drawn on the edges and is cut out. The edges are then folded upwards.
-
You can now bring all of the parts together and your pretty table lanterns are ready for the set table.
Another special tip for those who like things a little bit more special:
Round crown with decorative stones
You cut the metal foil into the shape of the creative sheet. You roll this into a round crown and stick the sides together. Cut out a round base plate and decorate it by gluing on colourful decorative stones.
[ © www.youthwork-practice.com | 2000 Games and Ideas for Youth Work ]


