source: www.youthwork-practice.com | 2000 Games, Devotions, Themes, Ideas and more for Youth Work
only for private using
Chocolate kisses catapult
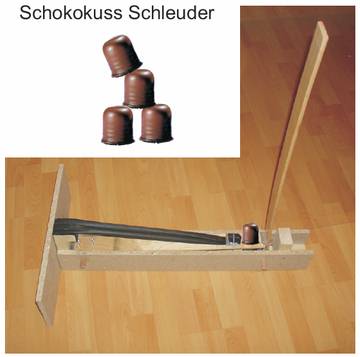
This is one of the most popular stations at a play street, the youth group or a camp. Previously it was known as Chocolate Marshmallow Catapult but comes as Chocolate kisses catapult these days.
There are many different models; I have built many and discarded just as much. Eventually, this model remained as my favourite. It is easy to make, easy to use, extremely reliable, robust, stable, and more so, the strength of your throw, as well as the distance, can be adjusted.
Material:
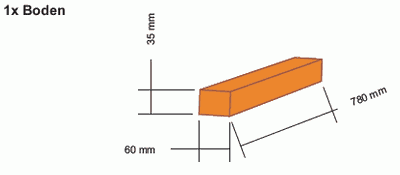
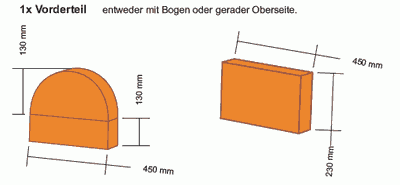
- The base is made of a chipboard approximately 400x300x16
- Timber 60x40 or 60x35x1050
- 2 bicycle tube 26 inch
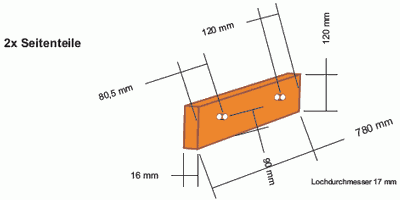
- 2 Slats of a slatted base 50x10x85
- Round wood 16x30
- 3 metal angles, as on the right
- 16 M4x35 screws
- 16 washers M4x10
- 16 nuts M4
- 8 circlips (optional underneath the U- washers)
- 24 Spax 40mm
- 1 Spax 120mm
- 1: Logs 8mm as wooden dowels
- Tacker Staples
- Cable ties
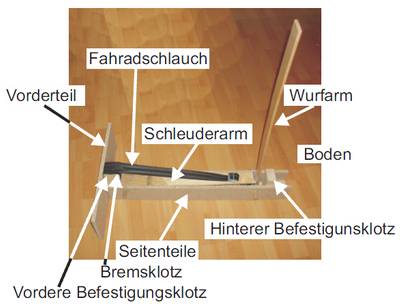
1x trigger arm , 1x ejection arm
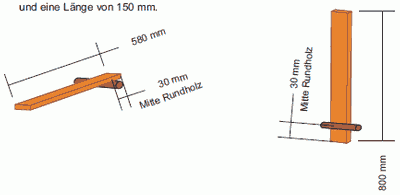
You best use the timber of a slatted frame. These are extremely stable while at the same time light weight. Usually, they also have the right size and more often than not you get them for free at a recycling centre. That’s the reason why I only give you the length below. The round wood should have a diameter 15-16 mm and a length of 150 mm.
How to assemble
-
Screw the bottom and side panel together using 10 Spax screw.
-
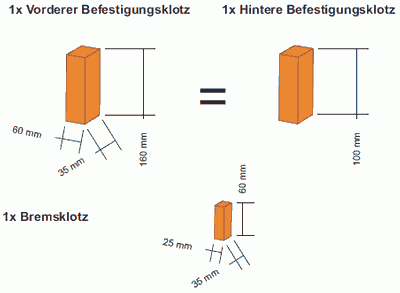
Secure the front mounting block. After screwing the side wall to the bottom, glue a wooden dowel of about 50mm into the mounting block.
-
Now attach the bicycle tube twice on the front mounting block.
-
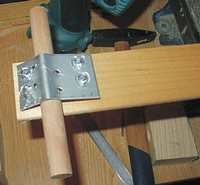
Now the round wood is attached to the two battens. To this end, saw off a metal angle, bend it upwards, mark the holes, drill them and then tie it up with metric screws. It is important that the angle is no longer then the batten.
-
Now insert the two slats in the logs through the holes provided for this purpose. Then attached the other side panel at the bottom.
-
Centre and screw the front part on the front mounting block and screw it to the bottom as well.
-
Now both bicycle tubes are attached to the throw batten. Later on, you have to test the exact length because every tube is different. With this slingshot, it is easy because you can recreate the tube. All you need to do is to saw an angle in half, sand it back and drill the holes into the wood. Now lead the tube between the two screws and underneath the angles and secure it with a cable tie. You will find that the rest would be longer then here of the picture below. If you want to adjust the throw length, you just loosen the screws and make the tube longer or shorter. The cable tie only serves for the rest tube not hanging off loosely.
-
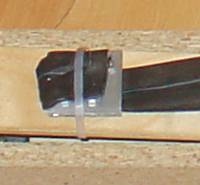
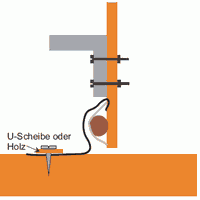
Now you need to secure the friction brake pad as well as the rear mounting block, just as shown right on the picture below. I wrapped the friction brake pad with a piece of bicycle tube so that the stretched tube does not rip. The pad I secured with two wooden dowels and one Spax screw. This way the wood definitely will not break. However, it is important that you pre-drill for the Spax screw.
-
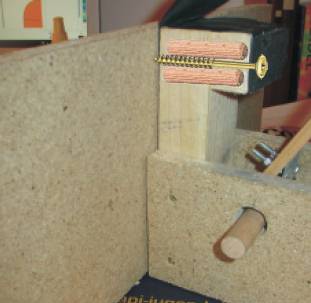
Now comes an aluminium or steel angle to the hook into the release arm. You will need an angle of about 13 mm to the front as it is shown on the image.
-
Here you can take the other side of the angle and bend it upwards. That way you save on the aluminium profile.
-
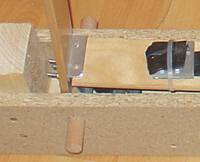
Lastly, comes the tube for the casting arm. This serves the purpose so that the casting arm in a tensed state only throws when the throwing arm was hit. In addition, you can adjust how hard the throwing arm has to be hit to be triggered. You need to secure the tube with a Spax and a large washer. Otherwise, it will rip.
-
If the game is played primarily with small children, the throwing arm could be replaced by a wooden disc to reduce the degree of difficulty. Now tension the slingshot and, using a tennis ball, try to trigger the sling shot. Remember when it comes to tensioning the slingshot never get in front with your body other than your hands of course. If it is triggered unintentionally and you are in front of it, this can not only be painful but also cause serious health damage.
Send in from Ronnie Berzins
[ © www.youthwork-practice.com | 2000 Games and Ideas for Youth Work ]


