source: www.youthwork-practice.com | 2000 Games, Devotions, Themes, Ideas and more for Youth Work
only for private using
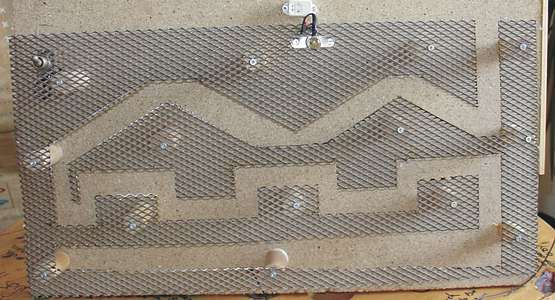
Hot Board
Basically, the hot board is the same as a hot wire. It is about getting a rod through a maze without touching the metal. However, if you touch the metal a light will go on or a sound will signal.
Material:
- 1 x Compression chipboard or a similar wood panel approx. 550x300x20mm
- 14 x round wood approx. 50x20
- 1 x E10 Socket for soldering
- 1 x 9-volt bulbs e10
- 1 x 9 Volt battery terminal
- 1 x 1 9V Battery
- 1 x Switch
- 1 x Buzzer or a 9 volt piezo
- 1 x round wood 25x15
- Thumbtacks ca 15x
- Insulated copper wire about 4 m.
- Thick copper wire about 25 cm.
- 1 x Rubber Ring
- 2 x Planed batten 24x2,5
- 2 x metal angle 2.5x2.5
- 1 x metal plate with holes
-
Draw the maze on the metal plate and cut it out with a Flex
-
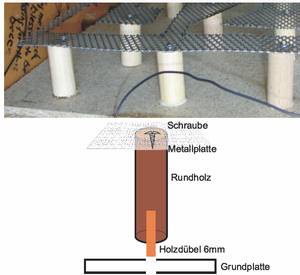
Saw all the round wood to the desired length and place it underneath the metal plate. When all the little logs are cut, put the metal plate on top and if necessary correct the position. Now, using a pen mark all areas of the logs and drill 6mm holes where all the round wood will be one day. Now drill the same 6mm holes in the little logs and attach the round wood to the metal plate using 6mm wood dowels. Now screw it all together.
-
Drill a hole for the switch in the metal and drill 3 more holes for the cables. Screw the socket on the metal plate in a way to create an electrical connection between the metal and the base of the socket. The buzzer, however, you screw to the wood.
-
Position the cables and solder them. Use the back side for this. Press the thumbtacks in the timber, attach the cable to the correct length, strip the insulation and solder.
-
For the handle of the game, saw it off and drill a hole at such an angle so that the hole comes out again in the middle. Place the flex through the hole in the middle, pull it out and solder with the thick copper wire. Use a little bit of hot glue in the hole and quickly push the copper back into it.
-
Saw the two brackets which hold the board in place at the right angle and fix it to the base.
-
If you did not saw off the groove at the base, you could use it wonderfully as a holder for the rod now. All you need to do is to glue a strip of wood directly on the groove.
-
Lastly, using a sealing ring or a piece of a bicycle tube and then build the bracket for the battery.
-
Plug in, play and have fun!
Send in from Ronnie Berzins
[ © www.youthwork-practice.com | 2000 Games and Ideas for Youth Work ]


