source: www.youthwork-practice.com | 2000 Games, Devotions, Themes, Ideas and more for Youth Work
only for private using
Origami – paper folding techniques
Introduction
In order to make figures from paper, you will need paper which is thin as possible. The thinner the paper, the lighter the paper.
Japanese paper is the best type for this. The art of Origami does come Japan after all. The information on the following pages describes how fold the different figures and shapes from paper.
Whether all of the figures really are original Origami figures is subject to discussion. The examples can be used for the game stations and possible forms are that the certain figures (following the example) must be folded within two minutes or that a group must fold as many figures as possible with the 2 minutes. The illustrated boats can also be used for a swimming/boat race competition.
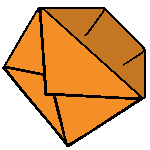
Steam boat
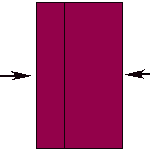
 1. First of all, fold a square piece of paper in half and open it up again.
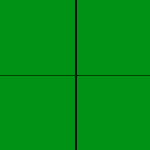
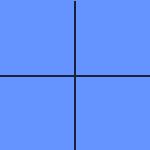 2. Now fold the paper in half in the other direction so that a + sign is made of folds in the paper when it opened up again.
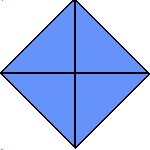
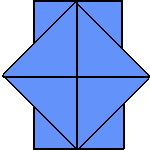
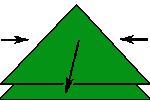
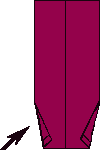
 3. Each corner is now folded down into the centre point so that a kite shape is produced. The sheet is now turned over.
 4. The corners are also folded down into the centre on this side.
 5. The paper is now turned over again and the corners are folded down into the centre a third time.
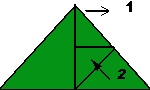
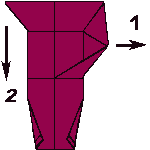
 6. The top and bottom corners are now folded outwards. This should lead to openings pointing outwards.
 7. The right and left hand corners are now folded outwards to make the bow and stern of the steam boat. The openings at the top and bottom are automatically flipped upwards and make the boat’s chimney.
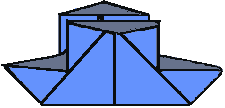
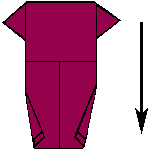
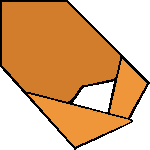
8. The steam boat is now finished.
Frog
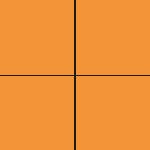
 1. First of all, a piece of square paper is folded vertically and horizontally.
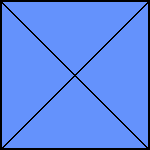
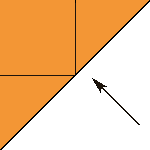
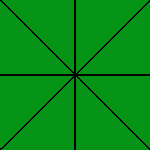 2. Now the whole sheet is folded once again on both diagonals.
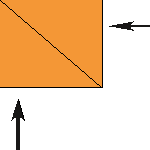
 3. The outer horizontal seams are now folded inwards so that they are touching. The top triangle which is shown by the seams is now folded downwards. Now the top and bottom triangles should be lying on top of each other.
 4. The top left hand corner is folded so that it meets up with the centre line.
 5. Now the triangle which has just been folded is flipped over to the right and then folded back so that the edge meets up with the centre line again.
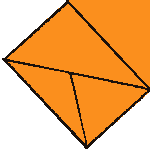
 6. Now the whole thing is flipped over to the left and the last two folds mentioned are repeated with the right hand corner. Once both sides have been worked on, the whole thing should look like this:
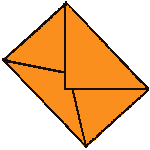
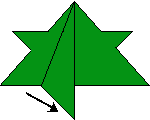 7. Now the whole thing is turned over to make the frog’s legs. The left corner is folded into the middle so that it meets up with the centre line.
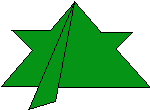 8. This corner is now folded half over back away from the centre line to make a leg. The whole thing is repeated on the right hand side and the frog is finished.
Shirt
 1. To make a shirt, you will need a square piece of paper first of all. The paper is laid down upwards. Fold it in half along the centre line and open it up again.
 2. The left side is now folded into the centre to the centre line. The same is done on the right side and then the whole thing is turned over.
 3. The collar of the shirt will now be made by folded the bottom end up by approx. 6cm. The result should look like this and then it is turned over.
 4. Taking the turned over sheet, the lower outer corners are folded inwards so that it looks like the following illustration.

 5. Then the right hand corner is third folded down from top to bottom and then folded down again so that a little square is made.
 6. The whole thing is unfolded once again to make the sleeves of the shirt. From the inner right hand corner a triangle is now folded outwards. This triangle meets up with the second horizontal fold. If the top square is now folded down again, the shirt sleeve to point outwards to the right.
 7. After the whole thing is repeated on the left side, you have now produced the 2 shirt sleeves. The square with the sleeves is now folded downwards again.
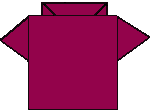 8. If the artwork is now turned over the shirt is finished.
3 prong serviette
 1. First of all a serviette is folded horizontally and vertically into a square.
 2. The bottom right hand corner is now folded diagonally up to the top left corner.
 3. Now the bottom corner and the right corner are folded into the inner square. Another square is produced from doing this.
 4. The shape is now turned over on the visible diagonal so that it is now lying on the reverse side. It is now folded up to the left on the visible diagonal.
 5. The top right corner and the bottom left corner are now bend over into the middle so that they are pushed into each other and provide each other with stability.
 6. The whole thing is turned over onto it's back and the two triangles at the sides are flipped outwards. This makes a serviette shape with 3 prongs which makes a pretty table decoration.
Beaker
To make a beaker with origami you will need a sheet of Japanese paper in a colour of your own choice.
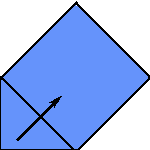
 1. The paper is folded once diagonally.
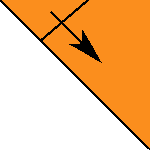 2. The next step is to fold the triangle which has been made inwards along the marked line.
 3. The same thing is done on the right hand side and has this shape.
 4. On both sides, the top points are now folded downwards. These points now lie on the side wings which were already made.
 5. Now the shape is pulled apart a little at the top to make an opening. Now the drinks beaker has been produced and we could fill it with a liquid.
[ © www.youthwork-practice.com | 2000 Games and Ideas for Youth Work ]


