source: www.youthwork-practice.com | 2000 Games, Devotions, Themes, Ideas and more for Youth Work
only for private using
Salt dough
Salt dough was known by the Greeks, Egyptians, Spanish and the indigenous people of Mexico. They created figures from bread dough which were placed in graves as a sacrifice and symbolised appreciation to the Gods.
-
Recipe for painted models
- 1 part flour
- 1 part salt
- Almost ½ part water
-
Recipe for natural models
- 750 ccm wheat flour
- 500 ccm salt
- Approx. 300 ccm water
- 1 oil (only a little)
Making the dough
First of all mix the flour and salt in a bowl and carefully add the water a little at a time. Use both hands to knead the mixture thoroughly. You will notice the consistency of the dough when kneading it. Drier dough is easier to model than sticky dough. Immediately place the dough into a plastic bag and use it straight away.
Plaited wreath
-
1st step: make a cord
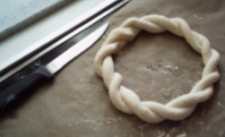
Make two equal lengths by rolling the mixture and then criss-cross the two rolls. From the middle, twist the two sides into a cord and place the whole shape onto baking paper.
-
2nd step: close the wreath
Lay the cord in a circle shape and close the circle. The two ends should then be cut straight with a knife, moistened and then pressed together. Some decoration will be applied to this point so that the point where the two ends meet is hidden.
-
3rd step: making and applying little roses
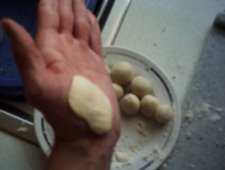
In order to make a rose you must make a little ball of dough, press it firmly between the thumbs so that it is flat and then carefully turn it over. If the dough is too sticky dust it with a little more flour and press it flat once again. The outer edge of the petals should be pressed as thinly as possible so that the petal looks natural. A rose can now be rolled into shape: take the flat dough and roll it into a spiral shape from the inside outwards making it into a rose. Make sure that the middle of the rose lies lower then the rest.
Several flat balls of dough are used to make larger roses. Flatten the bottom end of the dough and place the rose in the desired position. The rose is held in place better if a sharp modelling needle is stuck through the middle of the rose. Carefully remove the needle so that rose does not move.
-
4th step: making and applying leaves
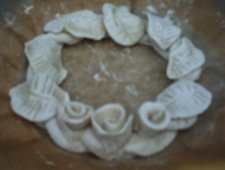
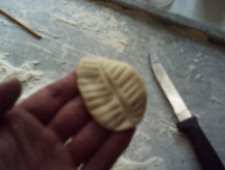
Roll little balls of dough into a skittle shape and flatten it in the palms of the hands. Use a modelling stick to mould the veins of the leaves and carefully lift up the leaf with a knife. Make the stalk with your hands and place the leaf on the wreath with the modelling stick.
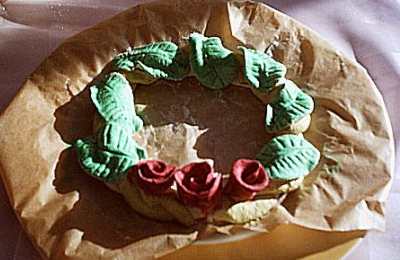
With this method you will achieve particularly fine outer edges on the leaves which looks like a natural leaf. If you repeat this process several times you will quickly have the skill for making leaves. The wreath is then finished.
Door sign
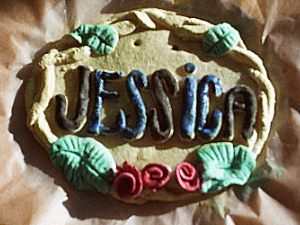
In order to make the door sign you must roll out the dough approx. 1cm thick and cut out an oval shape free hand or by using a stencil. Place the whole thing onto baking paper, smooth the edges and press two holes into the top to hang it up.
Little dough strings are now made into a cord for the finished door sign and are placed onto the moistened edge. Attach the cord to the lower centre of the sign and cover the points where the dough is pressed together with decoration such as a leaf or rose. Make some more rolls of dough and make them into letters on the work top to spell out the desired name. Before attaching the letters it makes sense to measure out the distance between the letters so that they all fit on the sign. Lift up the finished letters with a knife and place them onto the sign.
Boy
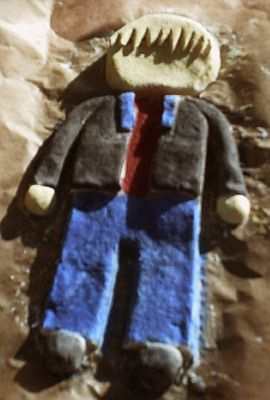
For this model you should use the recipe for the painted models. First of all roll out the dough 1cm thick, draw the basic shape of a boy and cut it out. Place the shape onto baking paper.
The trouser legs are cut from the underside; the edges are smoothed out, moistened and smoothed. Make the head and shoes from balls of dough and place them onto the model.
The dough must be rolled out thinly for the jacket. One side of the jacket is drawn, cut out and tried on. It may be necessary to make small changes. The jacket half is then placed in mirror image onto the dough and the other half is cut out. Attach both sides of the jacket to the model. Fold over the lapel and place two little strips of dough onto the jacket as a collar. Shape both arms and attach them. Make hands from little dough balls and press them down. Roll the dough out once again to make the hair and press it down. Cut out the hair and use a modelling stick to draw on the strands of hair. Cut out the fringe at different lengths and attach it to the moistened head of the model.
[ © www.youthwork-practice.com | 2000 Games and Ideas for Youth Work ]


