source: www.youthwork-practice.com | 2000 Games, Devotions, Themes, Ideas and more for Youth Work
only for private using
Knights Camp - Knight Games - Knights role play games - Simple craft ideas for knights - Knights Feast
Simple craft ideas for the knight theme
As always, the craft instructions are described simply and are generally quick to make. With a little bit of resourcefulness and patience, you can make objects similar to the equipment of a knight.
-
Helmet
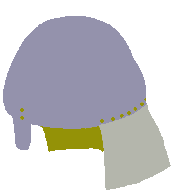
An old plastic ball can be cut into two halves to make a helmet (one ball=two helmets). The ball is then coved with tin foil or sprayed with silver paint. A linen sack can be tacked or screwed onto the helmet as a neck/chain protector. If required, the linen can also be sprayed with silver paint. A rubber band holds the helmet in position.
-
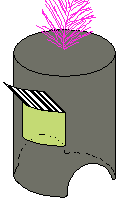
Box helmet
Another possibility to make a helmet is by using a used washing powder box (ideally round). In the shoulder area, two rounded indents are made into the box using a Stanley knife or a sharp, stable pair of scissors. The visor is cut into the box as a square or pentagon. Do not cut the top; this is used to push the visor up. A further 3-5 slits are carefully cut out for the knight to see through. 1-2 feathers can be stuck to the bottom of the helmet. The helmet is decorated with coloured cardboard.
-
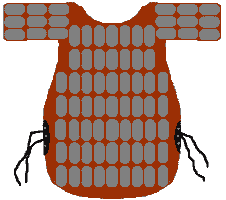
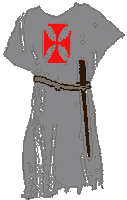
Knight’s armour
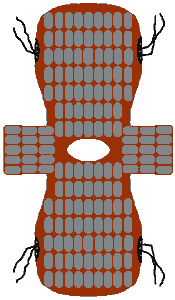
A knight's armour would obviously be great. However, this is probably too much work. For this reason, here is a simpler version:
Option 1:
From a very strong (very stable, thick) cardboard box or from stiff leather, a front and back section is cut out. Both pieces are then held together with straps over the shoulders. You can also paint a coat of arms on the front piece (see picture).Option 2:
The slightly more complicated version is that the front and back sections are made from leather and lots of small metal plates (about the size of a telephone card) are screwed on (see picture). The little metal plates must be smoothed off at the edges to avoid danger of injury.

-
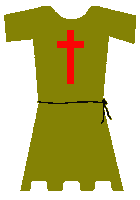
Knight’s robe
If putting a set of knight’s armour together is too difficult, you can also cut a simple robe in a knight style. A hole is cut into the middle of an old sheet or table cloth of that the head fits through the hole. A belt holds the front and back pieces of the garment together. A coat of arms or cross should not be missing. The best option is to use coloured materials to make the design.
-
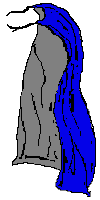
Knight’s cloak
Instead of making a complete robe, or perhaps in addition to the robe, you can produce a simple cloak. Simply take a coloured piece of material, lay it over the left and right shoulders and tie the ends together with a lace. The cloak should look similar to Zorro’s cloak. The material can hang down at the back to hip level. A coat of arms and a cross could also be sewn onto the cloak. If you do want to make a breast plate armour, this cloak could save you making the back piece.

-
Clothing for the common folk, varlets and future knights
The general public, varlets and knights-to-be did not possess any knight’s armour. For these costumes, you can use a potato sack for an apron, an old long leather coat (possibly cheap to buy at a flea market), or pieces of fur made into a cloak. A belt wrapped around the waist with a long dagger or a sword pushed through and the knight-to-be is ready, or a simple highwayman like in the times of Robin Hood.
A varlet’s shirt can be made from an old, knee-length t-shirt or sweat shirt. A different coloured collar should be sewn to the shirt. At the bottom of the shirt a trim can also be sewn or, depending on the material, can be cut into the shirt. An old belt or rope is tied around the waist in which a sword can be fixed in place.
A narrow pair of trousers (e.g. one colour jogging pants), legging or tights should be worn under the shirt.
-
Making armbands
Thick sturdy leather is cut into 10-15cm armbands. With the help of a leather band which is pulled through holes or fixed in place with screws, the armband is held in place. An armband helps protect against “slip-ups” during the sword fight.
-
Club or spiked mace
Obviously we do not want to make a real club and hurt anyone with it. However a dummy club is suitable. Take a wooden stick approx. 40cm long and 4cm wide and tie a foam ball (or similar non-dangerous ball) onto it with a piece of string.
-
Short sword fight
A 50cm sword can be made by taking a 10cm wide piece of wood, plywood or similar wood and sawing out the required shape with a jigsaw. Afterwards, the edges and the blade of the sword are smoothed off with a sanding machine. A sword can be ready to use in 10 minutes. Obviously this type of work should be undertaken by an adult. Painting and decoration (e.g. sticking on jewels, wrapping the handle with a leather band) can be suited to the individual tastes of each child.
The cheap version:
Push a branch through a cardboard ring (as hand protector) or simply tie on a short horizontal piece of wood. -
Sword sheath
The sharp sword was usually carried in a sheath. We can also make these ourselves. You will need a narrow board (approx. 8-10mm deep), leather or strong material, short nails or tacks and a fastening strip.
Now you must saw the board to size. The board should be as long as the blade of your sword (measured from the sword point to the beginning of the handle). The width of the board is based on the width of the sword plus approx. 10-15mm allowance. Now the leather or material should be fixed to the board so that the sword slip easily in and out of the sheath (don’t make the opening too narrow or too wide). A well fixed and fitted leather (or material) at the opening is the most important thing. With constant removal and entering of the sword, the leather can remove itself from the wood. A strip (leather band, piece of belt, roll belt, wool) should be stuck to the back. This allows you to wear the sheath on your belt.
-
Knight’s shield
A knight’s shield can be made from a strong piece of wood or from an 18mm deep piece of plywood cut out with a craft saw. The shield should measure approx. 40x60cm or 30x50cm for smaller children. Fighting shields can also be made a little larger.
If you do not have any electricity on the camp or if you do not want to buy expensive wood you could always use a strong cardboard box. This is usually suitable for smaller children. In order to carry the shield, two holes are made in the shield and a piece of string or leather band is pulled through. The finished shield should obviously be decorated with the coat of arms of the knight.
-
Lance
A lance point made from a sawn out piece of plywood is attached to a sweeping brush handle or long straight wicker. This lance is obviously not suitable for fighting but serves as a prop for some of the skill games. Another note: Running about between the tents and playing with these spears is not a good idea. The kids might hit a tent unintentionally which can lead to damage.
-
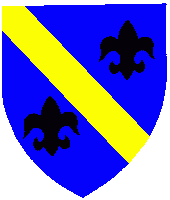
Coat of arms

Classic logos are 2 coloured shields with a fleur-de-lys, horse’s head, eagle and similar pictures drawn on it. There are no limits to your own fantasy. Despite this, it might be an idea to make several stencils before the camp/knight festival.
-
Further utensils to produce
- Cups, bowls, jugs, plates or cubes made from clay
- Wax seal: A coat of arms motive is carved into a piece of soft wood. The piece of wood can now be used for a wax seal. A simple carving design would be a fleur-de-lys, a knight’s cross, 3 rhombuses or other similar symbols.
- A parchment roll is written with a quill und ink.
- Simple leather pouches can be used to carry gold and silver pieces
- Colourful ribbons and medals, broaches for decorating breast plates and swords.
- Candle holders and candles for the long dark nights.
- Castle ghost
- The knight’s ladies have a long robe made from fine, elegant material. A long pointed hat with a nice veil and colourful ribbon attached to the point of the hat is easily made from cardboard.
[ © www.youthwork-practice.com | 2000 Games and Ideas for Youth Work ]


